Let me tell you something that took me way too long to figure out.
I spent years running jobs. Good jobs. Nice clients. Clean work. My crew showed up on time. We finished on schedule. The customer was happy. I was proud of the work.
And at the end of the month, I was basically broke.
Not “I blew my money on dumb stuff” broke. More like “I worked 60 hours a week and my checking account has $312 in it” broke.
Here is what was actually happening. I was guessing my numbers. Every single bid I put together was based on a rough idea of what materials would cost, a rough idea of how many hours the job would take, and whatever number felt right for labor. I would add a little on top for profit and send it out.
That “little on top for profit” was getting eaten alive by stuff I never even thought about.
None of that stuff showed up on my bids. Because I was not tracking it. Because I did not have a system.
I was pricing jobs based on direct costs only. Materials plus labor. That is it. And it looked profitable on paper. But after all the hidden overhead, all the little expenses, all the things I forgot to account for, I was working for almost nothing.
Most contractors learn their trade from another contractor. You learn how to frame a wall, run conduit, hang cabinets, pour concrete. You learn the craft. But nobody sits you down and says “here is how to calculate your burdened labor rate” or “this is how overhead gets allocated across jobs.”
So you guess. And guessing is what is bleeding you dry.
This is why I built this contractor job costing spreadsheet. Not because I wanted to make spreadsheets. Because I got tired of working hard and having nothing to show for it.
This is not a generic template you download and stare at for ten minutes before closing. This is a complete job costing system built for how contractors actually work.
The whole thing is designed to take you from “I think this job costs about $8,000” to “I know this job costs $8,247 and my profit is $1,820 at a 22% margin.”
That is a very different place to run a business from.
This was built for contractors who run their own business. The ones doing the work, writing the bids, paying the bills, and trying to figure out why there is nothing left over.
If you give quotes to customers and then do the work, this spreadsheet was built for how your business actually runs.
It does not matter if you are a one-person operation or you have a small crew. The math works the same. Your overhead is real. Your labor costs are real. And you need a system that accounts for all of it.
This is a digital download from Etsy. You buy it once, you own it, and you get four files:
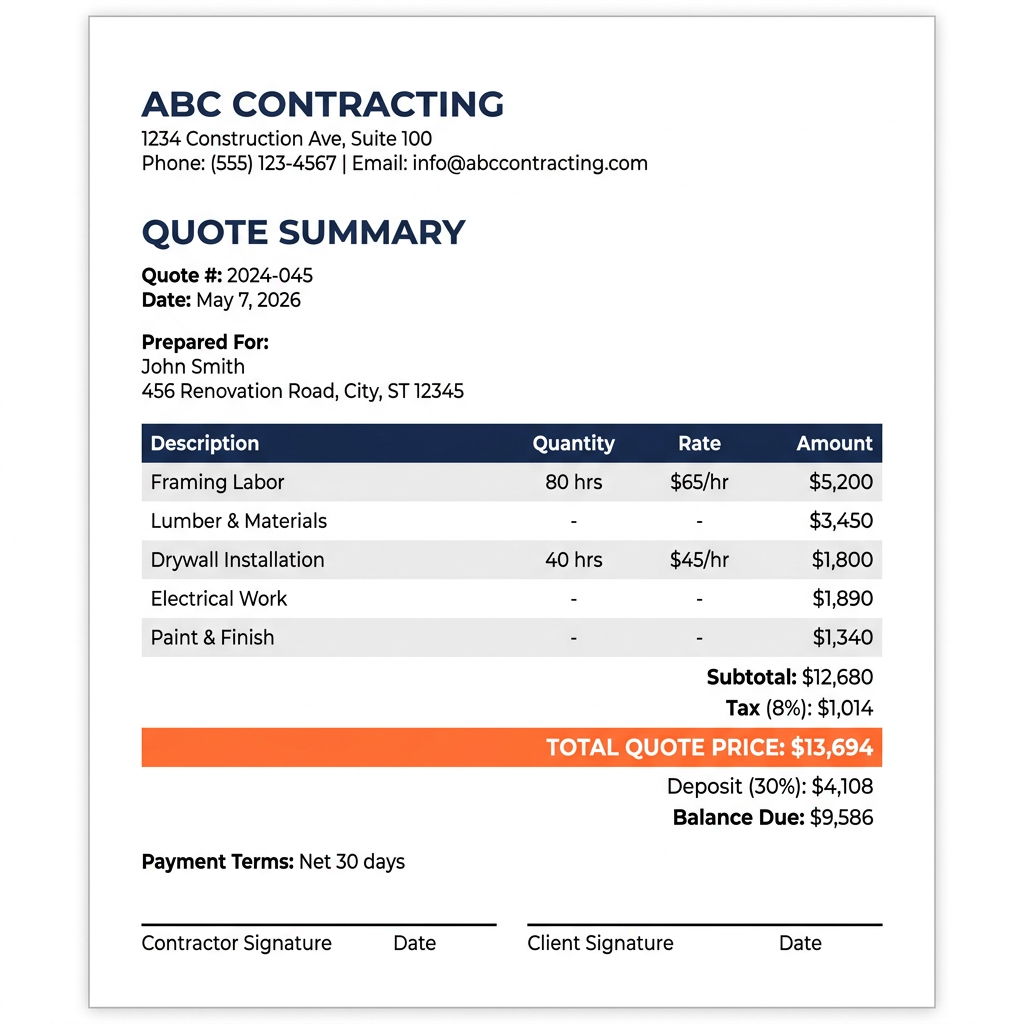
The Quote Summary tab creates a clean, professional quote ready to share with clients
The spreadsheet has eight tabs. Each one does something specific. Here is what they are and why they matter.
You do not need to be a spreadsheet wizard. If you can type numbers into a cell, you can use this. Here is the process:
Here is what it looks like to price jobs with your gut versus pricing them with a system.
One side is how most contractors operate. The other side is how profitable contractors operate. The difference is a system.
You do not need any special software. This spreadsheet works in:
You do not need Excel 365 or any subscription version. Any modern version of Excel (2016 or later) works fine. And Google Sheets is free with any Google account.
If you are on a tablet or phone, Google Sheets will open the file but the experience is better on a laptop or desktop. This is a working tool with a lot of data, so a bigger screen helps.
Let me show you three examples of how this spreadsheet changes the game on real jobs.
These are not fantasy numbers. This is what happens when you stop guessing and start tracking. The money was always there. You just could not see it because you did not have a system showing you where it was going.
Let me be straight with you about what this is and what it is not.
And honestly, that is the point.
Accounting software tells you what happened after the fact. It is backward looking. Your accountant at the end of the year can tell you whether you made money or lost money.
This spreadsheet is forward looking. It helps you price the job right before you start it and track costs while you are doing it. By the time your accountant sees the numbers, the damage is already done if you underpriced. This tool prevents the damage in the first place.
They work together. This spreadsheet feeds accurate job-level data into your accounting. Your accountant will love you for it.
Let me put this in perspective.
Hiring a bookkeeper who understands construction to set up your job costing? You are looking at $500 to $2,000 just for the setup, plus ongoing fees.
Building your own spreadsheet from scratch? If you value your time at all, you are looking at 20 to 40 hours of work. And it probably will not have the formulas right.
No monthly fees. No annual subscription. No per-user charges. You buy it, you download it, you own it. Use it on every job for as long as you are in business.
And here is the thing. The spreadsheet does not just help you on one job. It helps you on every job. For years. The more you use it, the more accurate your estimates get, the more profit you keep, and the more confident you feel about your pricing.
$49.99 is not a cost. It is the cheapest business insurance you will ever buy.
Contractor Job Costing FAQ: Real Answers to Real Questions
These are the questions contractors actually ask. Not fluffy marketing questions. Real business questions about pricing, costs, margins, and staying profitable. If you find your question here, there is a good chance this spreadsheet was built for exactly the problem you are trying to solve.
Pricing and Estimating
How do I price a contractor job accurately?
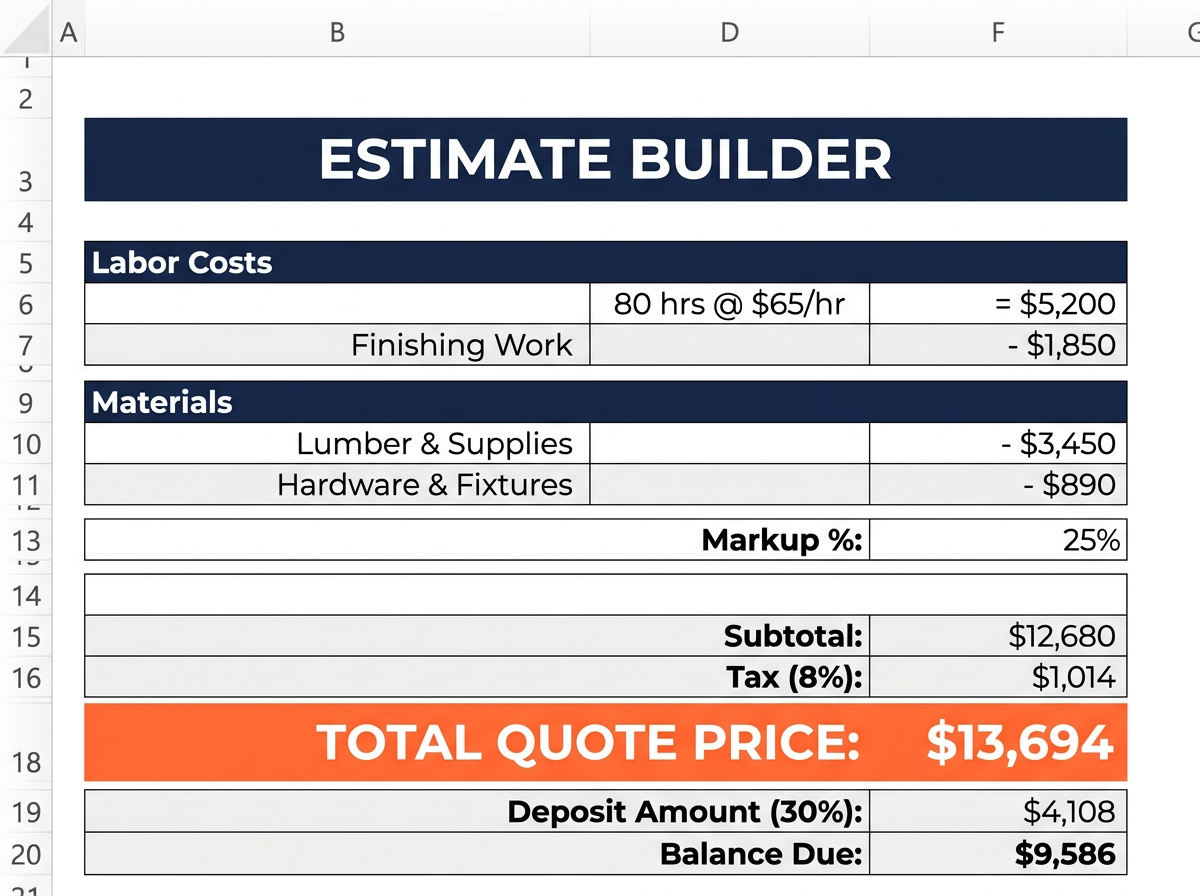
Accurate pricing starts with knowing every single cost that goes into a job. Not just the obvious ones. You need your material costs itemized, your labor costs calculated at the burdened rate (which includes taxes, insurance, and benefits on top of the hourly wage), your overhead costs allocated proportionally, and your desired profit margin applied on top of all that. Most contractors only add up materials and hourly labor, then tack on a percentage. That leaves out overhead entirely, which means you are subsidizing the job out of your own pocket without realizing it. The fix is a system that forces you to account for every cost category before you ever send a bid. That is exactly what an estimate builder in a job costing spreadsheet does. It makes sure nothing gets left out of the calculation, so your price covers your real costs and gives you the profit you are targeting.
How do I create a construction estimate?
A solid construction estimate has five main parts: materials, labor, subcontractor costs, permits and fees, and overhead. Start by listing every material you will need with quantities and current prices. Then estimate labor hours for each phase of the job and multiply by your burdened labor rate, not just the wage you pay. Add any sub costs, permit fees, and dumpster or equipment rentals. Then apply your overhead percentage, which covers the cost of running your business like truck, insurance, tools, and your own time. Finally, apply your markup to hit your target profit margin. The mistake most contractors make is skipping the overhead step. They think the bid looks expensive enough already. But without overhead, you are paying your business expenses out of what you thought was profit. A good estimate builder walks you through each category so nothing gets missed.
What is the best way to estimate material costs?
The best way is to be specific and current. Do not estimate “about $2,000 for lumber.” Go to your supplier or check current prices online and price out every item. 24 sheets of OSB at $38 each. 16 two-by-fours at $6.50 each. Be specific. Then add a waste factor, usually 5 to 15 percent depending on the material and the complexity of the job. Tile work has more waste than framing. Custom cuts have more waste than standard. Also price out the small stuff that people forget: fasteners, adhesive, caulk, sandpaper, tape, plastic sheeting. Those small items add up fast, especially on bigger jobs. The goal is to never be surprised by a material cost. If your estimate says $4,200 for materials and you spend $4,350, that is a 3.5% variance and you can learn from it. If your estimate says “a few grand” and you spend $5,100, you have no idea what happened.
How do I estimate labor costs for a project?
First, figure out your burdened labor rate. This is the real cost of having someone work for you, not just their hourly pay. Take their wage and add payroll taxes (FICA, unemployment), workers compensation insurance, any benefits you provide, and paid time off if applicable. A worker you pay $25 per hour probably costs you $35 to $40 per hour when you add everything up. Then estimate the hours for each phase of the job realistically. If you think framing will take 16 hours, and it always takes 20, use 20. Be honest with your estimates based on your real-world experience. Multiply hours by your burdened rate. That is your real labor cost. If you use subs, get their quotes and include those as line items. The biggest labor cost mistake is using the pay rate instead of the burdened rate. That gap can be 30 to 50 percent of the wage, and it comes straight out of your profit.
Should I use flat rate or hourly pricing?
It depends on the job. Flat rate pricing works best when you have a clear scope and you know your costs well. A standard water heater replacement, a straightforward roof, a basic bathroom remodel with defined finishes. You price it, the customer agrees, and you manage your costs. If you finish faster, you make more per hour. If it takes longer, you eat it. Hourly pricing (time and materials) is better for jobs with uncertain scope. Troubleshooting an electrical issue, discovery work, or a remodel where the homeowner is still deciding on finishes. It protects you from scope creep. The smart move is to use flat rate pricing but base it on detailed estimates using your real costs. That way you look professional to the customer, you know your margins, and you can track estimated vs actual to get better over time. Hourly pricing should be your backup for jobs you cannot accurately scope upfront.
How do I bid on a construction job to win it?
Winning bids is not just about being the cheapest. Most homeowners do not pick the lowest price. They pick the contractor they trust most who also has a reasonable price. Start with a detailed, accurate estimate so you know your real floor price. Then present it professionally. A printed or emailed quote with clear line items, your company info, and payment terms looks way better than a number texted from your truck. Explain your price. Show the client what is included. When they see the detail, they understand the value. Also, follow up. Most contractors send a quote and never call back. A simple follow-up call two days later puts you ahead of 80 percent of your competition. The spreadsheet helps with this because the Quote Summary tab creates a professional presentation of your numbers. That alone can be the difference between winning and losing a bid against someone who scribbled a number on the back of a business card.
How do I stop underpricing my jobs?
Underpricing almost always comes from the same place: not accounting for all your costs. The fix is simple but it takes discipline. You need to calculate your overhead and include it in every bid. You need to use your burdened labor rate, not your pay rate. You need to include waste, contingency, and your own time managing the job. Most contractors know their material costs pretty well. Where they fall apart is labor burden and overhead. If you have a $4,000 per month overhead (truck, insurance, phone, tools, office) and you do 8 jobs a month, each job needs to carry $500 of overhead just to break even on business expenses. If that $500 is not in your bids, every job is $500 less profitable than you think. A job costing spreadsheet forces you to include these costs because they are built into the formulas. You physically cannot forget them.
How much should I charge for my work?
The answer is: enough to cover all your costs and hit your target profit margin. That sounds obvious, but the reason so many contractors struggle is that they do not actually know all their costs. Here is the formula. Take your direct job costs (materials, labor at burdened rate, subs, permits). Add your overhead allocation. That gives you your total cost. Then apply a markup that gives you the profit margin you want. If you want a 20% net margin, you need a 25% markup. Not 20%. This is where margin vs markup confusion costs contractors real money. The price is not about what you feel comfortable charging or what you think the market will bear. It is about math. Calculate your real costs, add your real overhead, apply the right markup, and that is your price. If the market will not support it, you need to find a way to reduce your costs, not cut your profit.
How do I account for unexpected costs in my estimate?
Build a contingency line into every estimate. Industry standard is 5 to 10 percent of total job cost, depending on how much uncertainty there is. A straightforward re-roof on a house you have inspected thoroughly might only need 5 percent. A gut renovation of a 1920s house? You want 10 percent or more. The contingency is not profit. It is a buffer for the things you cannot predict: hidden water damage, an extra trip to the supplier, a crew member calling in sick, material prices changing between the estimate and the purchase. If you do not use the contingency, great. That flows to your profit. But if you need it, you have it, and you are not eating that cost out of your margin. Never present the contingency as a separate line item to the customer. It should be baked into your overall price. The customer does not need to see “contingency 8%.” They need to see a price that you can deliver on without losing money.
How do I present an estimate to a client?
Presentation matters more than most contractors think. A clean, printed or PDF estimate with your company name, logo, and clear line items immediately builds trust. Break the estimate into categories the client can understand: materials, labor, permits, and total. You do not need to show your overhead line or your markup percentage. Those are your internal numbers. The client should see what they are getting and what it costs. Include payment terms, a timeline, and what is included and not included in the scope. Walk the client through it in person or on a video call if possible. Explain each section briefly. When clients understand what they are paying for, they are less likely to push back on price. A professional quote also protects you. If there is a dispute later, you have a written document showing exactly what was agreed to. The Quote Summary tab in the spreadsheet creates this document for you automatically.
Job Costing Basics
What is job costing and why is it important for contractors?
Job costing means tracking every cost associated with a specific job so you know exactly how much that job cost you to complete. Not roughly. Not approximately. Exactly. It is important because it is the only way to know if a job actually made you money. You can look at your bank account and see the payment come in, but if you do not know the total of every expense that went into that job, you have no idea if you profited $3,000 or lost $500. Job costing also gives you data to improve. If you track costs on 20 jobs and you see that your labor estimates are consistently 15 percent low, you adjust. If you see that material waste on tile jobs is always 12 percent but you have been estimating 8 percent, you fix that. Without job costing, you are flying blind. You might be profitable. You might not. You literally do not know, and that is a terrible way to run a business.
How do I start job costing in my construction business?
Start simple. Pick your next job and track everything. Every material receipt, every hour of labor, every small expense. Use a spreadsheet, a notebook, whatever works. The key is to capture every dollar that job touches. Then, when the job is done, add it all up and compare it to what you estimated. That comparison is where the learning happens. You will almost certainly find that your actual costs were higher than your estimate. That is normal when you start. The point is to see where the gaps are. Was it materials? Labor hours? Something you did not account for at all? Once you do this for a few jobs, patterns emerge. Those patterns tell you exactly how to adjust your estimating. A job costing spreadsheet makes this process much easier because the categories are already set up, the formulas already work, and the comparisons happen automatically. You just enter the numbers.
What are the essential components of job costing?
There are three main components: labor, materials, and overhead. Labor is every hour spent on the job multiplied by the burdened cost per hour. Materials are every physical thing you buy for the job, from lumber to nails to caulk. Overhead is the portion of your business expenses that gets allocated to each job, things like your truck, insurance, tools, office costs, and your own management time. Some people add a fourth category for subcontractor costs and a fifth for permits and fees. That is fine. The point is that every single dollar has a home in one of these categories. If you miss one, your job cost is wrong. The most commonly missed component is overhead. Contractors remember to charge for materials and labor but forget that the truck they drove to the job site costs $800 a month whether they use it or not. That cost has to live somewhere. It lives in your job costs, or it lives in your empty bank account.
How do I track job costs effectively?
The key to effective tracking is making it easy and doing it consistently. If tracking is hard, you will stop doing it in two weeks. Here is what works. Collect every receipt. Photograph them with your phone if you need to. At the end of each day or at least each week, enter the costs into your tracking spreadsheet. Categorize each expense: material, labor, sub, permit, or other. Assign it to the correct job. For labor, track hours daily. Who worked, how many hours, on which job. This does not have to take more than 10 to 15 minutes per day. The important thing is consistency. Missing a $47 hardware store run does not seem like a big deal, but if you miss four of those a month across three jobs, that is $564 in untracked costs eating your profit. A job costing spreadsheet gives you a structure to enter this data. You just fill in the rows. The totals, comparisons, and variance analysis happen automatically.
What is the difference between job costing and accounting?
Job costing tells you how much each individual job cost and whether it was profitable. Accounting tells you how your overall business is doing financially for tax and compliance purposes. They overlap, but they serve different functions. Your accountant needs to know total revenue, total expenses, and net income for the year. Job costing tells you that the kitchen remodel on Oak Street made you $4,200 in profit but the bathroom renovation on Elm Street lost you $800. Accounting might show you had a decent year overall, but without job costing, you have no idea which jobs made money and which ones bled you. That distinction matters because it is the only way to improve your pricing. If you know that bathroom remodels consistently come in over budget on labor, you can adjust your estimating. Accounting cannot tell you that. Job costing can. They work together, and the best businesses use both.
How can I use job costing data to make better decisions?
Once you have job costing data from several projects, you can start making decisions based on evidence instead of gut feeling. You might discover that your most profitable jobs are roof replacements but your kitchen remodels barely break even. That tells you where to focus your marketing. You might find that one subcontractor consistently comes in over their quote while another is always on budget. That tells you who to keep hiring. You might see that your material estimates are always accurate but your labor hours are consistently 20 percent under reality. That is a clear signal to adjust your time estimates. Over time, this data becomes incredibly valuable. You build a track record of what things actually cost in your business, not what the internet says they should cost, not what another contractor charges. Your numbers. Your jobs. Your real costs. That is how you go from guessing to knowing, and that is how your business starts making consistent profit instead of rollercoaster results.
Profit Margin and Markup
What is the difference between profit margin and markup for contractors?
This is the question that costs contractors more money than almost anything else. Markup is the percentage you add on top of your costs. Margin is the percentage of the final selling price that is profit. They use different bases for the calculation, and the numbers are different even when people think they are the same. Example: you have $10,000 in total costs. You apply a 25 percent markup. That means you add $2,500 to your costs, and your selling price is $12,500. Your markup is 25 percent. But your profit margin is $2,500 divided by $12,500, which is 20 percent. Not 25 percent. When a contractor says “I mark up 20 percent, so I make 20 percent profit,” they are wrong. A 20 percent markup only gives you a 16.7 percent margin. If you want a 20 percent margin, you need a 25 percent markup. The spreadsheet handles this math automatically so you never confuse the two again.
How do I calculate profit margin for a construction job?
Profit margin equals your profit divided by your selling price, then multiply by 100 to get a percentage. So if your total job cost is $10,000 and you charged the customer $13,000, your profit is $3,000 and your margin is $3,000 divided by $13,000, which is 23.1 percent. The important thing is that total job cost means everything. Materials, burdened labor, subs, permits, AND your share of overhead for that job. If you leave out overhead, your calculated margin is artificially high and you are fooling yourself. A lot of contractors think they are making 25 percent margins when the reality is closer to 8 to 12 percent after overhead is properly accounted for. That is a painful realization, but it is better to know the truth and fix it than to keep believing a number that is not real. The spreadsheet calculates margin automatically using the complete cost picture, so the number you see is the real number.
How do I calculate the right markup for my services?
The right markup depends on what profit margin you want. The formula to convert a desired margin to markup is: Markup Percentage equals Desired Margin divided by (1 minus Desired Margin). So if you want a 20 percent margin, the calculation is 0.20 divided by 0.80, which equals 0.25, or a 25 percent markup. If you want a 30 percent margin, it is 0.30 divided by 0.70, which equals 0.4286, or a 42.86 percent markup. Most residential contractors target somewhere between 15 and 35 percent net margin depending on their trade, market, and overhead structure. Commercial work often runs tighter margins but higher volume. Your markup needs to cover overhead AND profit. If your overhead rate is 30 percent of direct costs and you want a 20 percent net margin, your total markup needs to account for both. The Business Settings tab in the spreadsheet lets you set your target margin and it calculates the required markup automatically.
What is a good profit margin for a general contractor?
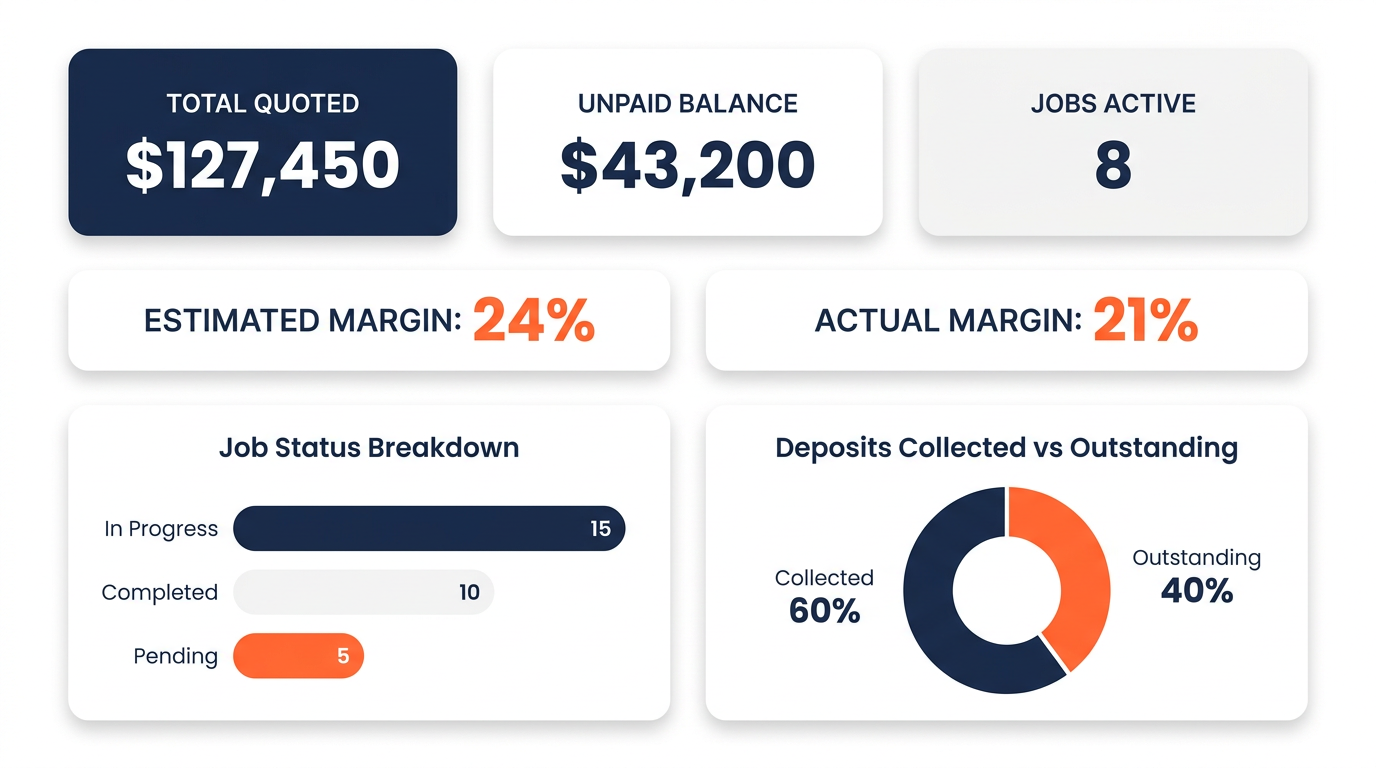
For most general contractors doing residential work, a net profit margin between 15 and 25 percent is solid. Some specialty trades can hit 30 percent or higher. Commercial GCs often work on slimmer margins, sometimes 8 to 15 percent, but with higher volume. The key word here is “net.” That means after all costs including overhead. A lot of contractors quote their “gross margin” which does not include overhead. That number is always higher and always misleading. If someone tells you they make 40 percent margins, they are probably talking gross margin before overhead, which might be a 15 percent net margin in reality. What matters is: after you pay for materials, labor, subs, permits, your truck, insurance, tools, phone, office, and your own time, what is left? That is your real margin. If it is 15 to 25 percent, you are doing well. If it is below 10 percent, your pricing needs work. The Dashboard in the spreadsheet shows you this number clearly for each job and overall.
Is a 20% margin the same as a 20% markup?
No. And this single misunderstanding costs contractors more money than almost any other mistake. A 20 percent markup means you add 20 percent on top of your costs. If your costs are $10,000, you charge $12,000. But your margin on that $12,000 is only 16.67 percent, not 20 percent. Because margin is calculated on the selling price ($2,000 profit divided by $12,000 selling price). A 20 percent margin requires a 25 percent markup. On a $10,000 cost, that means charging $12,500, giving you $2,500 profit, which is exactly 20 percent of $12,500. On a $50,000 job, the difference between a 20 percent markup and a 20 percent margin is $833 in profit. Over 20 jobs a year, that math error alone costs you over $16,000. The spreadsheet does this math correctly every time, so you never leave that money on the table again.
Labor Costs
How do I calculate my true burdened labor rate?
Your burdened labor rate is the total cost of having an employee work for one hour. It is always higher than their hourly wage. Start with the wage. Say you pay someone $28 per hour. Then add the employer portion of FICA (Social Security and Medicare), which is 7.65 percent. Add federal and state unemployment taxes, usually 2 to 6 percent depending on your state and experience rating. Add workers compensation insurance, which varies widely by trade. Roofers might pay 15 to 30 percent of payroll. Electricians might pay 5 to 10 percent. Add any benefits like health insurance contribution, paid time off, or retirement match. When you add all that up, a $28 per hour worker might actually cost you $38 to $45 per hour. That is your burdened rate. If you are billing jobs based on the $28 rate, you are losing $10 to $17 for every single hour that person works. On a job with 200 labor hours, that is $2,000 to $3,400 in hidden labor costs. The Business Settings tab helps you calculate this number correctly.
How do I track employee time accurately for job costing?
Keep it simple and consistent. The easiest method is a daily time log where each worker records how many hours they spent on each job. It can be a sheet of paper, a shared Google Sheet on their phone, or a simple app. The key is that hours are logged against specific jobs, not just total hours for the day. If a crew member worked 4 hours on the Smith kitchen and 4 hours on the Jones bathroom, both jobs need to reflect those hours. End-of-day logging works better than end-of-week because people forget. Friday afternoon, nobody remembers exactly how Tuesday went. Make it part of the routine. Before you leave the job site, log your hours. It takes two minutes. Non-billable time matters too. If your crew spent 2 hours picking up materials and driving between jobs, that is real time that either gets allocated to specific jobs proportionally or counted as overhead. Either way, it needs to be tracked so your labor costs are accurate.
How do I handle labor costs for subcontractors?
Subcontractor costs are simpler to track because they give you a quote or invoice for their work. That number goes directly into your job cost as a line item. You do not need to calculate a burdened rate for subs because their price already includes their own overhead, labor, taxes, and profit. Just enter their quoted amount in your estimate and their invoiced amount in your actuals. The thing to watch with subs is scope creep and change orders. If a plumber quotes you $3,200 for rough-in but the job takes longer because of unforeseen conditions, they might send you a change order for an additional $800. Track that. Your job cost tracker should show the original sub estimate and the actual final cost including any extras. Also, get sub quotes in writing before you build them into your estimate. A verbal “yeah, about three grand” is not a number you can rely on for accurate job costing.
Material Costs
How do I track material costs for each job?
Every material purchase needs to be assigned to a specific job. This is where most contractors lose track. You run to the hardware store and buy supplies for three different jobs on one receipt. Or you grab something from your truck stock that you bought last month. Both of those need to be tracked against the correct job. The simplest method is: photograph every receipt, note which job it is for, and enter it into your job cost tracker weekly. If you buy for multiple jobs in one trip, split the receipt and allocate each item. For truck stock items, keep a running inventory with costs and deduct from it when you use items on a job. It sounds like a hassle, but it is 10 minutes a day at most. Those 10 minutes save you from the mystery of “where did all my money go” at the end of the month. The Job Cost Tracker tab in the spreadsheet gives you a place to log each purchase with the date, vendor, description, and amount for each job.
How do I handle material waste and overruns in my job costs?
Waste is a cost that exists on every job. The question is whether you account for it or not. Standard waste factors vary by material. Framing lumber: 5 to 10 percent. Drywall: 5 to 8 percent. Tile: 10 to 15 percent, more for diagonal or complex patterns. Roofing shingles: 5 to 15 percent depending on the roof complexity. Paint: 5 to 10 percent. Build these waste percentages into your material estimates. If you need 100 square feet of tile, estimate for 110 to 115 square feet. That way, your estimate reflects what you will actually buy, not the theoretical minimum. When actual waste exceeds your estimate, track the overage. If you consistently see 18 percent waste on tile but you are estimating 10 percent, adjust your waste factor for future jobs. This is how your estimates get more accurate over time. The spreadsheet lets you see estimated vs actual material costs per job, so these patterns become obvious.
Should I mark up material costs?
Yes. And here is why. When you buy materials, you spend time sourcing them, picking them up or arranging delivery, managing inventory, dealing with returns, and handling damage or shortages. That time has value. A material markup of 10 to 25 percent is standard in the industry and compensates you for the procurement effort. It also provides a buffer for price fluctuations. If you quoted based on Tuesday’s lumber prices and you buy on Thursday and prices went up 4 percent, your markup absorbs that. Some contractors show the markup as a separate line item. Others build it into their material prices. Either way works, as long as it is included. If you are not marking up materials at all, you are essentially providing free procurement services to your customers. That is money you are leaving on the table. The Estimate Builder in the spreadsheet can include material markup as part of your bid calculation.
Overhead and Contingency
How do I calculate my company’s overhead costs?
List every expense your business has that is not directly tied to a specific job. This includes your vehicle payments and fuel, liability and commercial auto insurance, tools and equipment (both new purchases and maintenance), phone and internet, office space or home office costs, software subscriptions, accounting and bookkeeping fees, licensing and continuing education, marketing and advertising, and your own salary for time spent managing the business rather than doing billable work. Add all those up for a year, then divide by 12 for your monthly overhead. That number might surprise you. Most contractors underestimate their overhead by 30 to 50 percent because they forget about small recurring costs. A $150 software subscription, a $200 monthly tool budget, and a $300 insurance payment add up to $7,800 a year. The Business Settings tab in the spreadsheet has a section where you list all your overhead items. It calculates your total and helps you figure out how to allocate that overhead to each job proportionally.
How do I apply overhead costs to individual jobs?
The most common method for small contractors is to express overhead as a percentage of direct costs and apply that percentage to each job. Here is how. Take your annual overhead and divide it by your annual direct costs (total labor plus materials across all jobs). If your overhead is $60,000 per year and your direct costs are $200,000 per year, your overhead rate is 30 percent. That means for every dollar of direct cost on a job, you need to add 30 cents to cover overhead. So a job with $10,000 in direct costs would get $3,000 in overhead applied, making the true cost $13,000 before profit. You then apply your markup on top of $13,000, not on top of $10,000. This is where the “busy but broke” problem starts. If you mark up the $10,000 by 20 percent, you charge $12,000 and you think you are making $2,000. But your real cost was $13,000. You actually lost $1,000. The spreadsheet does this overhead calculation automatically once you enter your overhead items in Business Settings.
What is a contingency fund and how much should I include?
A contingency fund is a percentage added to your estimate to cover unexpected costs. It is not profit. It is a financial cushion for the unknown. Every job has surprises. The question is whether you planned for them or not. Standard contingency percentages range from 5 to 15 percent of total estimated costs. A simple, well-defined job like replacing a front door might only need 5 percent. A full gut renovation with unknowns behind every wall might need 10 to 15 percent. Base your contingency on the level of uncertainty, not on a fixed number. If you have done the exact same type of job 50 times and your estimates are consistently accurate, 5 percent is fine. If it is a new type of work or an older building with potential surprises, go higher. When the contingency is not used, it becomes additional profit. When it is used, it prevents a loss. Either way, you are better off having it in the estimate. Not including contingency is like driving without a spare tire. You might be fine. But when you are not, it really hurts.
Estimated vs. Actual Costs
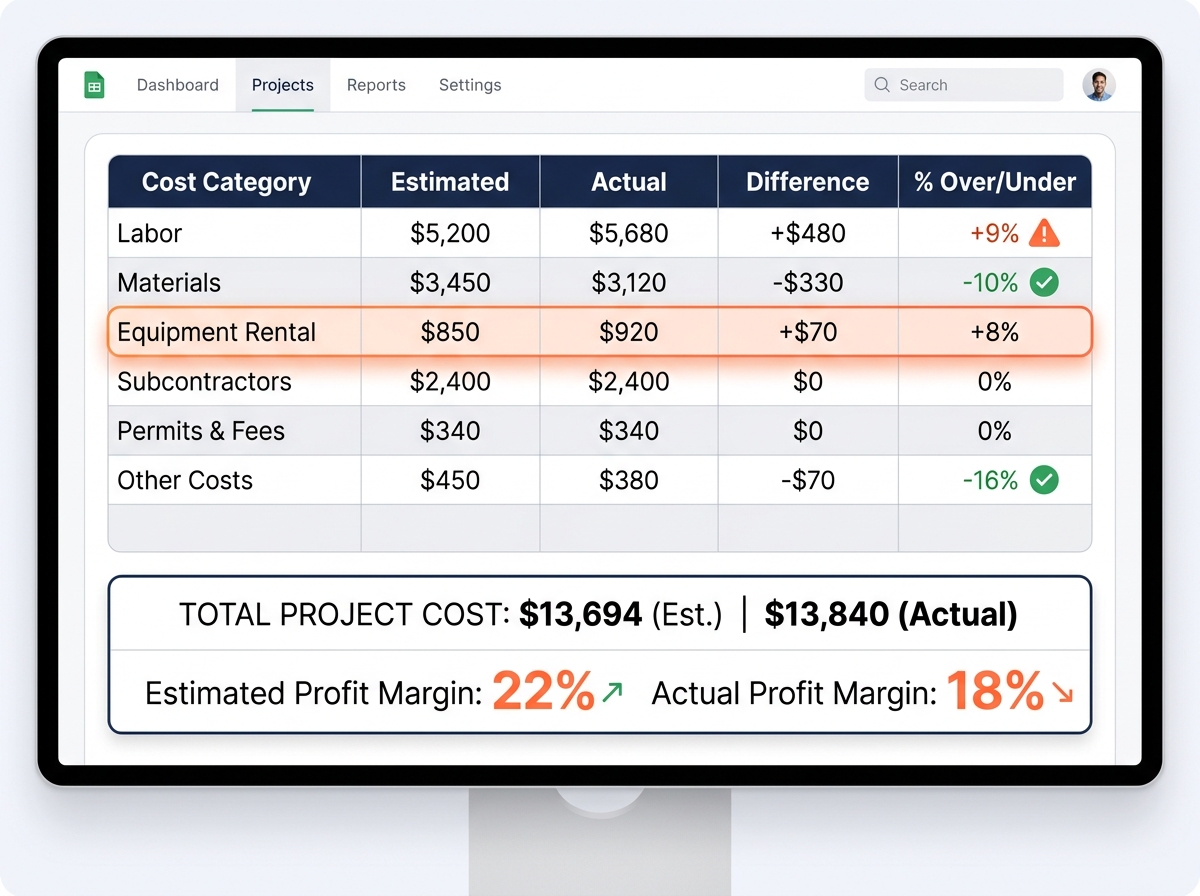
How do I compare my estimated costs to my actual costs?
Set up a system where every estimate has corresponding categories for tracking actuals. Materials estimated vs materials actual. Labor estimated vs labor actual. Subs, permits, overhead. Same categories, side by side. As the job progresses, enter your actual costs into the matching categories. At any point, you can see the variance, which is the difference between what you thought it would cost and what it actually cost. Positive variance means you are under budget. Negative means you are over. Do this comparison during the job, not just after. If you are 30 percent through a project and already 20 percent over on materials, you need to know that now, not when the job is done. The Job Cost Tracker in the spreadsheet does this automatically. You enter your actuals and it shows you the variance for each category and the total. That real-time visibility is what separates contractors who catch problems early from contractors who find out they lost money weeks after the job is finished.
What should I do when my actual costs are higher than my estimate?
First, figure out why. Look at the specific category that went over. Was it materials? Did prices change, or did you underestimate the quantity? Was it labor? Did the job take longer than expected, or did you have an unexpected complication? Was it something completely unplanned, like a code issue or hidden damage? Once you know why, take two actions. One, deal with the current job. Can you adjust the remaining work to recover some margin? Is there a legitimate change order for the client? Do you need to cut a cost somewhere else? Two, fix the estimate for next time. If your labor hours were 25 percent higher than estimated, adjust your labor estimating for similar future jobs. This is the feedback loop that makes you better over time. Every job that goes over budget teaches you something if you take the time to analyze it. Without tracking estimated vs actual, you just repeat the same estimating mistakes forever and wonder why you are always short on money.
Why do my jobs always go over budget?
If every job goes over budget, the problem is almost certainly in your estimating, not in your execution. The most common reasons are: your labor rate is based on wages only, not the burdened rate. Your overhead is not included in your bids. Your material estimates are based on perfect conditions with no waste. Your time estimates are optimistic rather than realistic. You do not include contingency for surprises. And you might be confusing markup with margin, so your “25 percent profit” is actually 20 percent or less. Fix these one at a time. Start by calculating your real burdened labor rate and use it in every estimate. Then calculate your overhead and include it. Then add realistic waste factors and contingency. You will find that your estimates go up, which might feel uncomfortable at first. But those higher estimates are the accurate ones. The old ones were wrong. They were just wrong in a way that felt affordable to the customer and left you broke. The spreadsheet forces all of these corrections into your estimates by default.
Deposits and Payments
How much of a deposit should I require from clients?
Standard practice for residential contractors is 10 to 50 percent of the total project cost as a deposit, depending on the job size and your state’s regulations. Some states have laws capping how much you can collect upfront, so check your local requirements. For smaller jobs under $5,000, a 50 percent deposit is common and reasonable. It covers your material costs so you are not financing the job out of pocket. For larger projects, a 10 to 33 percent deposit is typical, with progress payments scheduled at milestones. The key is to structure payments so you are never too far ahead of the money. If you have $8,000 in costs invested and the client has only paid $3,000, you are carrying $5,000 of risk. Break the project into phases and collect payment at each phase. The spreadsheet does not process payments, but the Project Tracker helps you schedule and monitor milestone dates so you can align your payment requests with project progress.
How do I create a payment schedule for a construction project?
Tie payments to project milestones, not calendar dates. A calendar-based schedule like “pay $5,000 on the first of each month” does not account for project delays or acceleration. Milestone-based payments keep the money flowing in proportion to the work completed. A typical residential payment schedule looks like this: deposit at contract signing (covers initial material purchases), second payment at rough-in completion (framing, plumbing, electrical done), third payment at a mid-project milestone (drywall, flooring started), and final payment at substantial completion or punch list sign-off. The exact percentages depend on how costs distribute across the project. Front-loaded jobs (heavy material purchases upfront like a kitchen remodel) need more money earlier. Labor-heavy jobs can be more evenly distributed. Whatever schedule you choose, put it in writing as part of your contract. Clear payment terms prevent disputes and keep cash flowing so you are never financing the client’s project with your own money.
Project Tracking and Spreadsheets
How do I manage multiple projects at once?
The biggest challenge with multiple projects is losing track of where each one stands. You need a single view that shows all your active jobs with key information at a glance: job name, status, budget, actual costs to date, percentage complete, and any flags or issues. Without this, you end up with a mental list that is always incomplete and a constant low-grade anxiety that you are forgetting something. The Project Tracker tab in the spreadsheet gives you exactly this. Every active job in one view with the numbers that matter. You can see which jobs are on budget, which ones are trending over, and which ones need attention. It also helps with resource planning. If you see three jobs overlapping next month, you know you need to plan your crew schedule accordingly. Running multiple jobs from a single tracking system beats running them from memory, text messages, and a stack of folders in your truck.
Can I use a spreadsheet for job costing?
Absolutely. A well-built spreadsheet is one of the best tools for job costing, especially for small to medium contractors. It is flexible, you own it, there are no monthly fees, and you can customize it to fit your business. The downside of a blank spreadsheet is the setup. Building formulas for burdened labor rates, overhead allocation, markup calculations, and estimated vs actual comparisons from scratch takes real spreadsheet knowledge and a lot of time. And if you get a formula wrong, every number downstream is wrong too. That is why a pre-built job costing spreadsheet template is such a practical solution. The formulas are already built and tested. The categories are already set up. The structure is already designed for how contractors actually work. You just enter your numbers. You get the power and flexibility of a spreadsheet without the 30 hours of setup time and the risk of formula errors. It is the sweet spot between a blank Excel file and expensive software.
What should a good contractor job costing spreadsheet include?
At minimum, it should have a way to set up your business costs (labor rates, overhead), build detailed estimates with automatic overhead and markup application, track actual costs against those estimates, view variance between estimated and actual, track multiple projects, and generate a professional quote for clients. A really good one also includes a visual dashboard so you can see trends without digging through cells, a built-in instructions tab so you do not need external documentation, and sample data so you can see how it works before entering your own numbers. It should be organized logically, use formulas that update automatically when you change inputs, and be usable in both Excel and Google Sheets. It should not require VBA macros, plugins, or any coding knowledge. If it requires you to be a spreadsheet expert to use it, it is missing the point. The whole reason you buy a template instead of building your own is to save time and get something that works right out of the box.
Contractor Business Mistakes
What are the most common reasons contractors lose money on jobs?
The top reasons are: underestimating labor hours, not calculating the burdened labor rate, ignoring overhead in bids, confusing markup and margin, poor change order management, material waste that was not accounted for, scope creep that is not documented and charged, and not
tracking costs during the job so problems are only discovered after completion. Notice that none of these are about doing bad work. Most contractors who lose money do excellent work. The problem is on the business side, not the trade side. They are pricing based on incomplete information and not tracking whether reality matches their estimates. Every one of these problems is preventable with a basic job costing system. You do not need fancy software. You need a structured way to estimate all your costs, track all your expenses, and compare the two. That is literally what a job costing spreadsheet does. Fix the system and the money problems start to fix themselves.
How can I avoid the “busy but broke” trap?
The “busy but broke” trap happens when you have plenty of work but your prices do not cover your full costs. You stay busy because your prices are low (which makes you competitive), but you stay broke because those low prices do not leave enough after expenses. The exit strategy has three steps. First, calculate your real costs including burdened labor, overhead, and a fair profit margin. This is the math that tells you what you should be charging. Second, start pricing every job using those real costs. Your bids will be higher than before. You might lose some jobs. That is okay. You were losing money on those jobs anyway. Third, track your estimated vs actual costs on every job to keep improving your accuracy. Over time, you will do fewer jobs at higher margins and make more money working less. The fear is “if I raise my prices, I will lose all my customers.” The reality is you will lose the customers who were costing you money, and the customers who stay are the profitable ones. That is a trade worth making every single time.
What are the biggest financial mistakes small contractors make?
Number one is not knowing their numbers. Not their overhead, not their burdened labor rate, not their real profit margin. They operate on gut feeling and hope for the best. Number two is mixing personal and business finances. When everything runs through one account, you cannot tell if the business is actually profitable or if you are just cycling money. Number three is not charging for their own time. If you spend 6 hours a week on admin, bidding, and project management and you do not account for that in your pricing, you are working for free. Number four is inconsistent estimating. One job gets a detailed estimate, the next one gets a back-of-napkin number. The inconsistency means you have no reliable data to improve from. Number five is the markup and margin confusion we already talked about. These are not character flaws. They are gaps in business education that nobody fills for tradespeople. A job costing system fixes most of them by forcing you to look at the real numbers instead of the comfortable ones.